Quick Takeaways
- 1 design × 30 color mockup templates = 30 finished images, generated in one session with no manual repetition
- The workflow runs in four steps: upload mockups → define placement → upload designs → create and download
- No Photoshop, no Smart Object files, no per-image size and transparency adjustments
- Every new account gets 50 free credits — enough to test a full color variant batch before spending anything
How to Create 30 Color Variant Mockups in One Session – The Bulk Mockup Creator Workflow
Color variants are one of the biggest time traps in print-on-demand selling, and the Bulk Mockup Creator workflow was designed specifically to eliminate that trap. This post walks through the full four-step process — exactly how you go from a folder of design files and a set of product photos to hundreds of finished, download-ready mockup images in a single session.
Why Do Color Variants Create So Much Extra Work for POD Sellers?
The math is brutal when you do it manually. One design, ten color variants, five mockup angles — that’s 50 individual images. Each one needs the design placed, sized, and adjusted for that specific product photo. In Photoshop or Canva, you repeat the process 50 times. Most sellers give up and list only three or four colors, which means they’re leaving potential sales on the table every single day.
The problem isn’t effort — it’s that the task doesn’t scale. The manual approach forces you to work harder every time you add a new design or a new color. A bulk mockup generator inverts that relationship: you do the setup once, and the output scales automatically with your catalog.
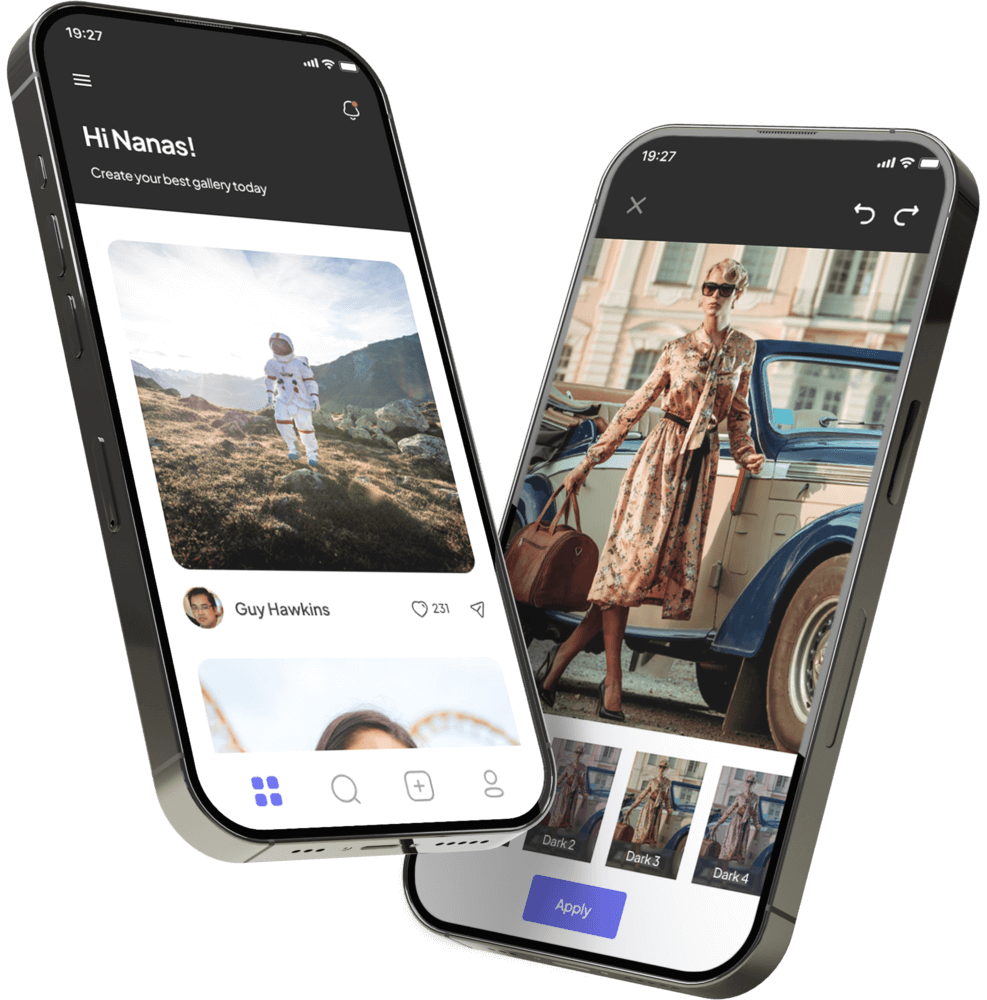
Step 1 – Upload Your Mockup Templates and Define Placement Areas
Your mockup templates are your own product photos — lifestyle shots, flat lays, model photos, anything you own or have licensed. Upload them into the platform under Upload Mockups. Each photo starts as a non-patterned file until you define where the design goes.
Click Define Areas on any uploaded photo. This opens a placement editor where you mark the design zone on that specific image — the chest area of a t-shirt, the front panel of a mug, the face of a tote bag. You set this once per template. Every future batch using that template will use the exact same placement, keeping your design size and position perfectly consistent across all your listings.
Once placement is defined, the file moves from the non-patterned queue into your active mockup library. It’s ready to be paired with any design, in any batch, from that point forward.
Step 2 – Upload Your Designs (All of Them at Once)
Navigate to Upload Designs (Patterns). This is where you upload your PNG files with transparent backgrounds — the actual artwork you want to appear on the product. Upload as many as you need in one go. There’s no restriction on uploading in bulk here.
The platform supports up to three design zones per mockup template — a primary zone (required) and two optional secondary zones for designs that need a second graphic element, like a back print or a sleeve detail. For most standard POD listings, the primary zone is all you need. You can see the full format requirements on the FAQ page.
Step 3 – Run the Mockup Creation Wizard
This is where the bulk production happens. Open Create Products and you’ll see a selection screen: on the left, your uploaded mockup templates; on the right, your uploaded designs. Select the combinations you want — you can mix and match freely — then hit Continue to Preview.
The platform shows you a confirmation of every combination it’s about to generate. Review it, confirm, and the engine runs. It applies every selected design to every selected mockup template, processes all the combinations in parallel, and outputs finished images organized into downloadable folders by design.
Thirty designs selected, ten mockup templates selected — that’s 300 finished images generated in one run. All of them at consistent quality, consistent sizing, consistent placement. Visit the pricing page to see how many credits each pack covers at this kind of volume.
Step 4 – Download and Go Live
Finished batches appear under Output Products. Each folder is named after the design it was built from, so your file organization stays clean even when you’re generating hundreds of images. You can preview any folder before downloading, select specific folders, or grab everything at once with a single download.
From there it’s a straight path to your Etsy listings — no renaming, no resizing, no further editing required. The images come out ready to upload. If you want to make sure your output settings are right for Etsy’s image requirements before you run a large batch, the FAQ covers recommended file sizes and formats.
Frequently Asked Questions
How many mockups can I generate in a single session?
There’s no cap on a single session — the limit is your available credits. One credit produces one mockup image. If you have 250 credits from the Golden Pack and you’re running a 10-design × 25-template batch, that’s exactly 250 images and uses all your credits in one go.
Do I have to redefine the placement area every time I run a new batch?
No. You define the placement area once per mockup template when you first upload it. After that, the platform remembers the placement and applies it automatically every time that template is used in a batch — whether you run it today or six months from now.
What file format do my designs need to be in?
PNG files with a transparent background are required for your designs. A minimum size of 2000×2000px is recommended for clean, high-resolution output. JPEG files won’t work for designs because they don’t support transparency.
Can I use mockup templates I bought from a designer or a marketplace?
Yes, as long as your license allows you to use the template for commercial production. Any PNG or JPEG product photo you’re licensed to use commercially can be uploaded as a mockup template and paired with your designs.
Where do I start if this is my first time using the platform?
Every new account gets 50 free credits with no credit card required. Sign up, upload one mockup template, upload a few designs, and run your first batch. The full walkthrough is available in the FAQ, and the platform’s built-in wizard guides you through each step.
The color variant problem is real, it costs sellers hours every week, and it’s entirely solvable. Upload your templates once, batch your designs, and let the platform do the repetitive work. Claim your 50 free credits on the shop page and run your first bulk batch today.